To deliver your second project to the intended audience of readers, you need to publish the document on the Help for Hokies site as a blog post. These instructions will walk you through the process.
Preparing to Create Your Post
Before you can upload your PDF to the Help for Hokies site, you need to complete these steps:
- Download your second project from Google Drive as a PDF.
- Register on the Help for Hokies site to create a personal login.
- Upload Your PDF to the Help for Hokies Site. Be sure that you have the permalink URL to your PDF. See the tips on the Upload page if you need to copy it again.
Creating Your Post
- Log into the Help for Hokies site, using the username and password that you registered. The Log In link is in the upper left toolbar on the Help for Hokies site.
- Click the + New link in the upper toolbar, marked with the red rectangle in the screenshot below:
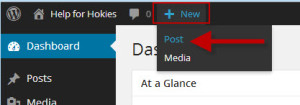
(Note: If you cannot see the details in the images, just click on them for a larger version of the screenshot.) - Choose the Post command from the submenu, marked with the red arrow in the screenshot above.
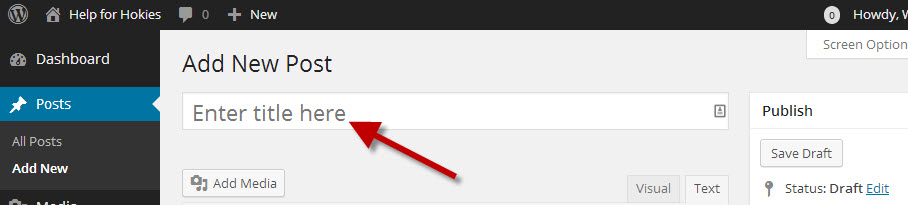
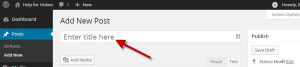
- Add the title for your document in the title field on the page, marked by the red arrow in the image below:
- Add a sentence or two that introduces your document in the composing area of the page, marked with the red arrow in the image below:
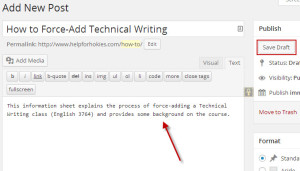
- Click the Save Draft button, in the Publish box on the right sidebar, marked with the red rectangle in the screenshot above.
- Under the intro you have added, insert the link to the PDF you uploaded using this format:
[pdf]Permalink URL to your PDF Here[/pdf]
For instance, if the link to my PDF is http://www.helpforhokies.com/?attachment_id=27, the insert code would be
[pdf]http://www.helpforhokies.com/?attachment_id=27[/pdf]
- Click the Save Draft button, in the Publish box on the right sidebar, again to save your draft.
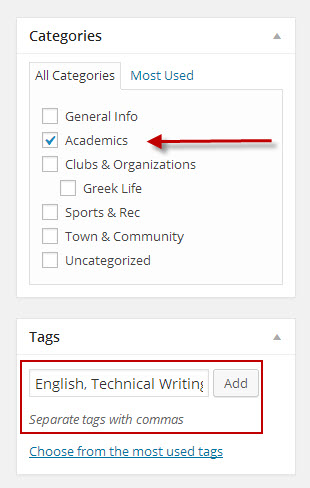
- Scroll down to the Categories and Tags sections in the right sidebar, shown in the screenshot below:
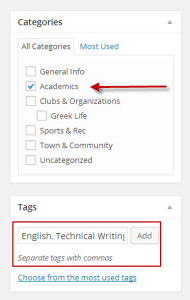
- Choose the category that best fits your PDF by checking the related checkbox. You should choose only one category. For the example of “How to Force-Add Technical Writing,” I chose the Academics category, shown with the red arrow in the Categories screenshot above.
- Be sure to uncheck “Uncategorized” category if it is checked.
- Type keywords that describe your PDF in the Tags area, shown in the red rectangle in the screenshot above, following these guidelines below:
- Begin each keyword with a capital letter.
- Separate keywords with commas.
- Do NOT use the word “and.”
- Use short phrases (usually no more than two words) if appropriate.
The keywords for the example post are English, Technical Writing, Force Add, and Course Request.
- Click the Add button beside the Tags to save the keywords that you have typed.
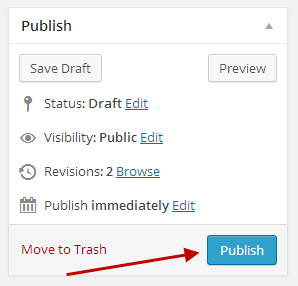
- Scroll back up to the top of the page, and click the Publish button in the Publish box at the top of the right sidebar, marked with the red arrow in the screenshot below:
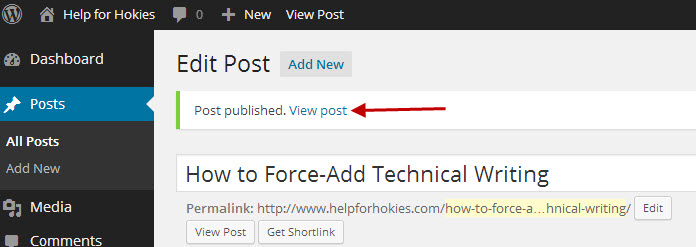
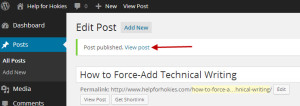
- Click the View post link at the top of the page, marked with the red arrow in the screenshot below, to see your post on the live site.
- Copy the link for the live page to turn in for credit on Project 2, as explained in the instructions for Submitting Project 2.